
WhatsApp has fundamentally transformed how businesses communicate with customers, with over 2.5 billion users worldwide and 175 million people messaging businesses daily. The platform’s remarkable 98% open rate nearly five times higher than email marketing’s 20% makes it an indispensable channel for customer engagement.
In this comprehensive guide, we’ll walk you through every step of the process from setting up your Meta Developer account, configuring Twilio for virtual number, to connecting WhatsApp to n8n which is required for building WhatsApp AI Agent that can scale with your business needs.
What You Need Before Connecting WhatsApp to n8n
Before you dive into building powerful WhatsApp automation workflows using n8n, there are a few essential requirements you’ll need to check off. Getting these in place early ensures a smooth setup and avoids the common roadblocks many face.
For this guide, we’ll focus on connecting WhatsApp to n8n using Meta’s official WhatsApp Business API, the most reliable and scalable solution for long-term use.
While services like Twilio offer third-party access to WhatsApp, they come with added costs, limitations, and sometimes reduced control over branding or message templates.
By using Meta directly, you get:
- Full control over your WhatsApp Business account
- Direct access to the WhatsApp Manager inside Meta Business Suite
- Better scalability and trust signals for customers
To use the official WhatsApp Business API (via Meta), you’ll need:
- A Facebook account linked to your business
- A Meta Business Manager account
- Your business must be verified, this typically requires: Legal business registration documents and live business website that includes a Privacy Policy and Terms of Service
- A dedicated phone number that is not registered on WhatsApp
Important: The phone number you use must not already be registered with WhatsApp (personal or business).
You can purchase a new number from providers like:
- A standard SIM card with SMS access
- Virtual number providers like Telnyx, Vonage, or Twilio (just for number rental)
Once verified and approved, this number will be linked to your WhatsApp Business profile inside Meta and you’ll be ready to automate messages via n8n.
Step 1: Create a Business Portfolio in Facebook (Meta Business Manager)
Creating a Business Portfolio (also called a Business Manager account) is essential for managing your business assets, including WhatsApp Business API, Facebook Pages, ad accounts, and more.
Access Meta Business Manager
If you’re not already logged in, sign in using your personal Facebook account credentials. (You’ll need a personal Facebook account to create and manage a Business Manager account.) Open your web browser and go to the Meta Business Manager site: https://business.facebook.com/
Start Creating Your Business Portfolio
On the Business Manager homepage, click on the “Create Account” button located at the top right corner. A popup window titled “Create a Business Manager” will appear.
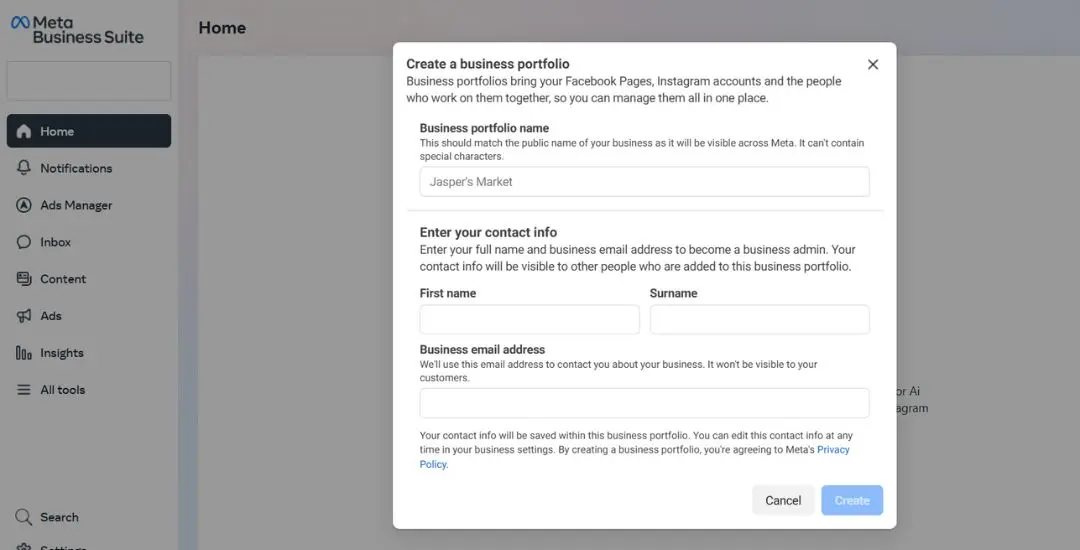
Enter Business Details
- Enter your Business Portfolio Name, this should be your company’s official name or the name you want to appear on your business assets.
- Enter your Your Name, this is your personal name associated with your Facebook account.
- Enter a Business Email Address, use an email that is actively monitored, as this will be used for important communications.
- Click Create.
Add Business Information
- Select the Business Type that best describes your organization from the dropdown menu (e.g., “Local Business,” “Company,” “Agency,” etc.).
- Fill in your Business Address, Phone Number, and Website URL.
- Click Submit to finish creating your Business Manager account.
Verify Your Business
- Once your Business Manager is created, you may be prompted to verify your business.
- To verify, go to Business Settings (gear icon on the top right) → Business Info.
- Click Start Verification and follow the instructions, which may include submitting business documents such as Business registration certificates, Tax ID or Other proof of business identity
- Complete verification to gain access to advanced features like WhatsApp Business API.
Step 2: Setup Your Meta Developer Account
Setting up your Meta Developer account is the foundation for accessing WhatsApp’s Cloud API. This process involves creating your developer account, configuring a business app, and enabling WhatsApp integration. The entire setup takes few minutes and requires basic business information.
Access the Developer Platform
Navigate to https://developers.facebook.com/ to begin your journey into Meta’s developer ecosystem. This platform serves as your central hub for all Meta business integrations, including WhatsApp, Instagram, and Facebook APIs.
Account Registration Process
Click the “Get Started” button prominently displayed on the homepage. This initiates the registration flow where you’ll provide your basic account information and agree to Meta’s developer terms of service.
Phone Number Verification
Meta requires phone number verification to ensure account security and prevent spam. You’ll receive an SMS with a one-time password (OTP) that must be entered within the specified timeframe to proceed.
You can use your personal mobile number for verification, this number can be different from the phone number you intend to use for WhatsApp API
Email Verification
After phone verification, confirm your email address through the verification link sent to your inbox. This email will serve as your primary communication channel for account updates and security notifications.
Business Role Selection
Choose your business role from the available options. While the selection doesn’t significantly impact WhatsApp API access, selecting “Developer” or “Business Owner” provides the most relevant dashboard experience.
Step 3: App Creation and Configuration
Initiate App Creation
From your developer dashboard, locate and click the “Create App” button on top right. This opens the app creation wizard that guides you through the configuration process.
App Type Selection
Select “Others” from the app type options. This choice is crucial as it enables access to WhatsApp Cloud API functionality, unlike consumer app types that have limited business features.
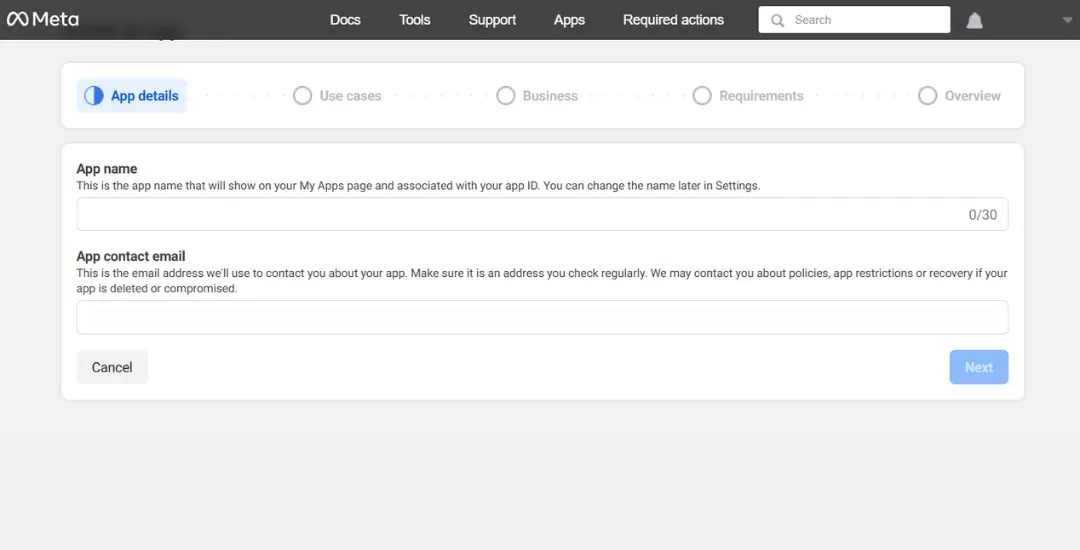
Enter App Details
Choose a clear and descriptive name for your app that reflects your business or specific use case. A common practice is to use your company name followed by “WhatsApp API” to make it easily recognizable. Avoid generic names that may conflict with existing apps. Then, enter a valid email address for the app’s contact email.
Use Case Selection
When prompted to select a use case for your app, choose “Connect with customers through WhatsApp.” This option enables the necessary permissions and features required for sending and receiving messages via the WhatsApp Business API.
Link To Business Portfolio
To publish your app and access third-party user or business data, you need to link it to a Business Portfolio. For this setup, select the Business Portfolio you created earlier in Step 1. This ensures your app is properly linked and ready for WhatsApp API approval.
Publish Requirements
To access and maintain permission to use user and business data through your app, Meta requires you to complete specific steps, primarily business verification.
If your business is already verified, you’ll see a message stating: “No requirements identified. This may change if you add more to this app.”
This means you’re currently compliant, but new requirements may appear if you request additional permissions or expand the app’s functionality in the future.
Important: Business verification is essential for apps using the WhatsApp Business API. Without it, your app won’t be approved for production use.
Convert Your App from Development to Live
Before your app can go live and be used in a production environment, you’ll need to complete a few final settings in Meta’s developer console.
Navigate to your app’s settings
Go to App Dashboard, click on Settings → Basic
Fill in the required fields
- Privacy Policy URL – Link to your website’s privacy policy
- Terms of Service URL – Link to your terms of service page
- Scroll down and enter your Data Protection Officer’s (DPO) contact information – this is required under GDPR compliance
Switch the app to Live mode
Once all required fields are completed, go to the top menu bar, toggle the App Mode switch from Development to Live
Your app is now live and ready for use in a real-world WhatsApp integration.
Step 4: Getting a New Number for WhatsApp API Setup
To connect WhatsApp to n8n via the WhatsApp API, you’ll need a dedicated phone number that is not already registered with WhatsApp (either personal or business). This number will be permanently associated with your WhatsApp Business account once approved, so it’s best to start with a clean, unused number.
You have two main options:
- A standard SIM card with SMS access (from any mobile carrier)
- A virtual number from trusted providers like Twilio, telnyx or Vonage
In This Guide: We’ll Use Twilio to Get a Virtual Number – Twilio is most popular platform and offers a straightforward way to rent a virtual number that supports SMS capabilities required for WhatsApp registration.
Follow these steps to set up your Twilio account and purchase a number:
Visit the Twilio Website & Create New Twilio Account (If you dont already have one)
Start by going to the official Twilio website: https://www.twilio.com/ Click on “Sign Up” if you don’t have an account yet. During the sign-up process, you’ll be asked to provide personal and business details. Once submitted, you’ll receive a verification email. Click the link in the email to activate your account and proceed to the Twilio Console.
Add a Payment Method
Once your account is created, upgrade to a paid account. To do so:
- Navigate to your Account Settings
- Add a credit or debit card as your payment method
Twilio offers free trial credits (typically $15) for new accounts, allowing users to experiment with their services without initially requiring a credit card. However, purchasing non-US phone numbers requires upgrading to a paid account with an active payment method due to regulatory compliance requirements, documentation needs, and address verification processes that vary by country.
Buy a Virtual Number
Go to Phone Numbers in the left sidebar, Click Manage → Buy a Number
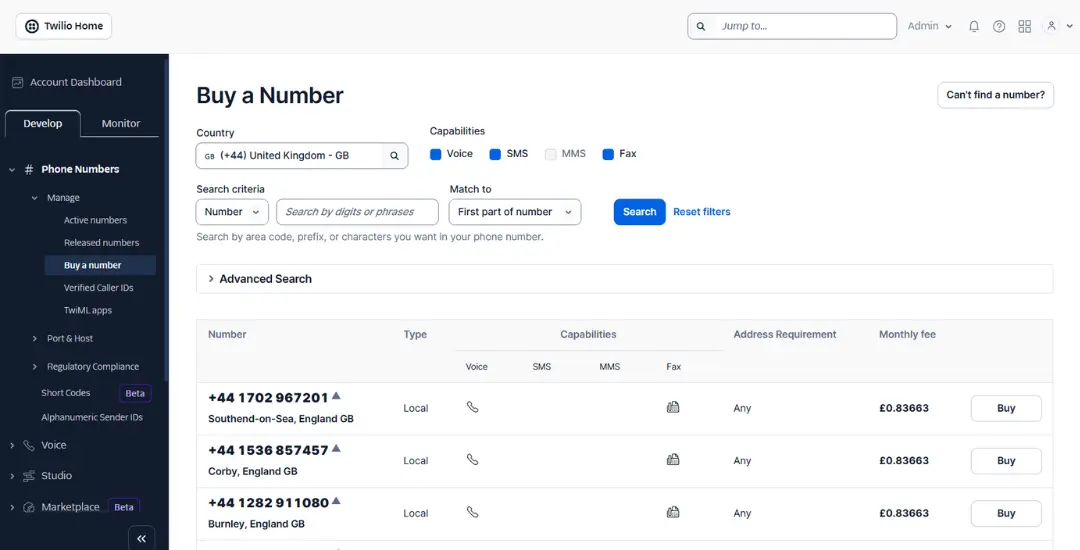
Use the filters to search for a number by: Country, Capabilities (select SMS and optionally Voice). Review the list of available numbers. Click Buy next to the number you want
Create a Regulatory Bundle (Required for Some Regions)
If this is a new Twilio account and you’re purchasing a number in a country with telecom regulations (like the UK or EU), you’ll need to create a Regulatory Bundle before your number can be fully activated. A Regulatory Bundle is a set of documents and business details that Twilio requires to comply with local telecom laws.
In the Twilio Console, go to:
- Phone Numbers → Regulatory Compliance → Bundles
- Click Create Bundle
- Choose your regulation type and country
- Follow the prompts to enter your business information and upload required documents
- Submit the bundle for review
Approval Time: Review time can take up to 48 hours. You’ll be notified via email once approved.
Check Messages Sent to Your Twilio Number
Once you’ve purchased and activated your Twilio number, it’s important to confirm that it can receive messages, During the WhatsApp setup process, Meta will send a verification code (OTP) to the number you provide to confirm ownership. If your number cannot receive messages, the setup will fail.
You can verify message reception in multiple ways. Here are two simple options:
Option 1: Twilio Console Message Logs (Quick & Easy)
The most straightforward method is to use Twilio’s built-in message logs. Log in to your Twilio Console, Navigate to Monitor → Logs → Messaging. From here, you’ll be able to view: Incoming message content and timestamps.
Option 2: Set Up a Webhook to Forward Messages (Advanced)
If you prefer messages to be automatically forwarded to your email or another tool, you can configure a webhook.
- Go to Phone Numbers → Manage → Active Numbers in Twilio
- Select your purchased number
- Scroll to the Messaging section
- In the “A MESSAGE COMES IN” field, enter your webhook URL
This allows you to forward incoming messages, including Meta’s verification code to your inbox, Slack, or internal system automatically.
Step 5: Add a New Number to Your WhatsApp App
Once your Twilio number is set up and capable of receiving messages, the next step is to connect it to your WhatsApp App inside the Meta Developer Console.
Follow these steps to add your number and complete the verification process:
1. Navigate to WhatsApp API Setup
- Go to your app’s dashboard in the Meta Developer Console
- In the left sidebar, click on WhatsApp → API Setup
2. Add a New Number
- Scroll down to the **”Send and receive messages”** section
- 2. In Section 1, click the dropdown next to “Select a number”
- 3. Choose “Add a new number” from the dropdown options
This will launch a guided wizard to help you register your number with Meta.
3: Fill in Business Information
A popup titled “Fill in your business information” will appear.
- Ensure the business name exactly matches your legal business name
- Meta is strict about name consistency, this is the name users will see when chatting with your WhatsApp bot.
- Select your verified Business Portfolio from the list
- Choose your country from the dropdown
- Click Next
4: Complete Business Profile Details
On the next screen, enter your Business Profile information:
5: Enter and Verify Phone Number
You will now be prompted to enter the new phone number you intend to use for WhatsApp.
- Enter the Twilio number you purchased earlier
- Choose “Text Message (SMS)” as your preferred verification method
- Meta will send a 6-digit OTP to that number
6: Enter the OTP Code
Check your Twilio Console Message Logs (or your webhook, if set up) for the incoming message from Meta containing the OTP.
- Enter the OTP code in the verification field
- Once verified, the number will be linked to your WhatsApp Business account and ready for use
You’ve now added your number for WhatsApp API messaging – current status of number will show as pending.
Step 6: Generate Permanent Access Token
Before you get started, double-check that your business portfolio has been submitted for review on Facebook Business. If your portfolio hasn’t been reviewed, you may not be able to proceed with creating a permanent access token.
1. Navigate to Facebook Business Settings
Go to business.facebook.com. Select the account you’re setting up, and then choose the WhatsApp Cloud API app you’ve created and the business it’s linked to.
2. Add a New System User
On the left sidebar, click on System Users. Here, you’ll see an option to add a new system user. Click Add, provide a name for the user, and make sure to select the role as Admin. This ensures the user has the necessary permissions.
3. Assign Assets and Permissions
Once the system user is created, click Assign Assets. Select the app you’ve created and give the user Full Control. Admin rights are essential for generating a permanent access token. Click Save Changes to confirm.
4. Generate the Permanent Access Token
With permissions in place, click Generate Token. Select your app and set the token expiration to Never for a permanent token. Under Permissions, scroll down and select WhatsApp Business Management and WhatsApp Business Messaging. Click Generate Token.
5. Secure Your Token
Once generated, your token will be displayed only once. Make sure to copy it and save it in a secure place. You won’t be able to view it again through the Facebook interface.
Step 7: Activating Your WhatsApp Number
Once you’ve generated your permanent access token, the next crucial step is to activate your WhatsApp number. This step links your number to the WhatsApp Cloud API and verifies that messaging is working as expected.
1. Locate the API Endpoint
Head to the API Setup page in your Facebook app dashboard. Here, you’ll find the endpoint URL required to activate your number. Copy this URL, it will look something like:
https://graph.facebook.com/v22.0/1234567890/messages
2. Prepare the Activation Request
You’ll need to send an HTTP POST request to the above URL. The body of the request should look like this (make sure to replace **YourNumber** with the actual phone number you want to activate, in international format):
{
  "messaging_product": "whatsapp",
  "to": "YourNumber",
  "type": "template",
  "template": {
    "name": "hello_world",
    "language": {
      "code": "en_US"
    }
  }
}
– `messaging_product`: Must be set to `”whatsapp”`.
– `to`: The WhatsApp number you want to activate (e.g., `”441234567890″`).
– `type`: Set this to `”template”` for sending a pre-approved message.
– `template`: This object contains the template name (e.g., `”hello_world”`) and the language code.
3. Send the POST Request
You can use tools like [Postman](https://www.postman.com/), cURL, or your preferred HTTP client to send the request. Don’t forget to include your permanent access token in the Authorization header:
Authorization: Bearer
Content-Type: application/json
If the request is successful, you’ll receive a response confirming that the message has been sent and your number is now active on WhatsApp Cloud API. You should see the “Hello World” template message delivered to your WhatsApp.
Activating the number is essential, you can’t send or receive messages from the API until your number is verified this way. This also confirms that your integration is set up correctly.
You can now move on to customizing templates or integrating WhatsApp Cloud API with n8n.
Step 8: Integrate WhatsApp Cloud API with n8n
After activating your number and securing your permanent access token, you’re ready to build automated WhatsApp workflows in n8n. This step will show you how to use the WhatsApp Trigger node to listen for messages, and the Reply (or WhatsApp Business Cloud) node to send responses, using your permanent token for secure operations.
1. Connect WhatsApp Cloud API Credentials in n8n
- Go to n8n dashboard and navigate to Credentials.
- Click “Create new credential” and search for WhatsApp Business Cloud.
- Enter your **Permanent Access Token** and WhatsApp Business Account ID in the required fields.
- You will find these in Meta’s API Setup page where you generated your token.
- Save and test the connection to confirm successful integration
2. Listen for Incoming WhatsApp Messages (Trigger Node)
- In your n8n workflow, add the WhatsApp Trigger node.
- Choose your WhatsApp Cloud API credential.
- Select the event type you want to monitor. For most automations, set this to `Messages` to trigger the workflow whenever a new WhatsApp message is received.
- Once configured, deploy the workflow. n8n will register a webhook with WhatsApp so incoming messages activate your automation.
3. Fetch Message and User Details
Within the WhatsApp Trigger node’s output, you’ll have access to full message metadata such as:
- Sender’s number
- Message content (text, media, etc.)
- Timestamp
- Message type
4. Reply to WhatsApp Messages (Reply Node or WhatsApp Business Cloud Node)
- Add the **WhatsApp Business Cloud** node to your workflow.
- Set it to **Send Message** or **Send Template**, depending on your needs.
- Use the same WhatsApp credentials you configured earlier—the permanent access token will ensure uninterrupted API access.
- In the node settings: Set the “To” field by referencing the sender’s number from the trigger output (e.g., `{{$json[“from”]}}`)
- Compose your response or select a message template.
- You can chain logic so each incoming message automatically gets a customized reply.
Your workflows can be fully automated, set up triggers for specific message types, build interactive bots, or integrate AI responses. Using the permanent access token ensures your automations won’t break due to token expiry.
Unlock Seamless Business Growth with WhatsApp Automation
Setting up WhatsApp Cloud API and automating workflows with n8n unlocks seamless, interactive communication for your business. By following these practical steps, you can enable reliable, automated messaging, giving your customers faster responses and boosting your brand’s digital presence.
If you’re a business owner eager to leverage the full potential of WhatsApp for sales, support, or marketing automation, our n8n automation experts can help you take the next step!
Book a Discovery Call to explore how WhatsApp automation can elevate your business and transform your customer engagement. Empower your business with smarter messaging solutions today!