Losing automation data can halt business operations, disrupt workflows, and erase hours of configuration work. For anyone running n8n on Google Cloud, regular backups aren’t just a safety net, they’re essential for disaster recovery and maintaining automation reliability.
Google Cloud’s persistent disk snapshots offer a straightforward, automated way to protect your entire n8n environment, ensuring you can recover quickly from failures or mistakes. This guide shows how to set up automated, reliable backups for your self-hosted n8n instance on Google Cloud, no manual scripts, no hassle.
Understanding Your n8n Deployment on Google Cloud
Most self-hosted n8n users deploy the platform on a Google Cloud VM, using Docker Compose for easy management and updates. In this setup, all critical data, including workflows, credentials, and execution history lives on the VM’s persistent disk, often inside Docker volumes or the local-files directory.
Backing up the persistent disk means you’re not just saving n8n workflows; you’re capturing the entire environment: Docker containers, configuration files, and any custom scripts or integrations. This approach covers every piece of your automation stack, minimizing the risk of missing vital data during a restore.
Why Use Google Cloud Persistent Disk Snapshots for n8n Backups?
Persistent disk snapshots are point-in-time copies of your VM’s disk. They capture the full state of your n8n environment—including all Docker data, files, and configurations—without shutting down your instance. The main benefits for n8n users:
- Point-in-time recovery: Restore your entire environment to a specific moment, ideal for recovering from failed upgrades or accidental changes.
- Full backup coverage: Snapshots include everything on the disk, so you don’t need to track down individual files or volumes.
- Automated and low-maintenance: Google Cloud’s snapshot schedules handle backup creation and retention, eliminating manual work and reducing human error.
- Cost efficiency: Snapshots are incremental, so only changed data is stored after the first backup, keeping storage costs manageable
For a detailed, step-by-step guide on updating your self-hosted n8n instance using Docker Compose, be sure to check out our article: How to Update Self-Hosted n8n with Docker Compose.
Setting Up Automated Backups for n8n Instance
Lets go through the step-by-step process to configure automated backups for n8n instance.
Create a Snapshot Schedule
Google Cloud allows us to automate this process with a snapshot schedule, no manual intervention needed.
Access the Snapshot Schedules in Google Cloud
Start by logging into your Google Cloud Console. From the main menu, go to Compute Engine and select Snapshots. Here, you’ll see a tab labeled Create snapshot schedule, click on this tab to begin setting up your backup routine.

Name and Organize Your Backup Schedule
You’ll be prompted to enter a name for your new schedule. Choose something descriptive and easy to recognize, such as n8n-daily-backup. This helps you quickly identify the schedule later, especially if you manage multiple backup routines across different projects or environments.
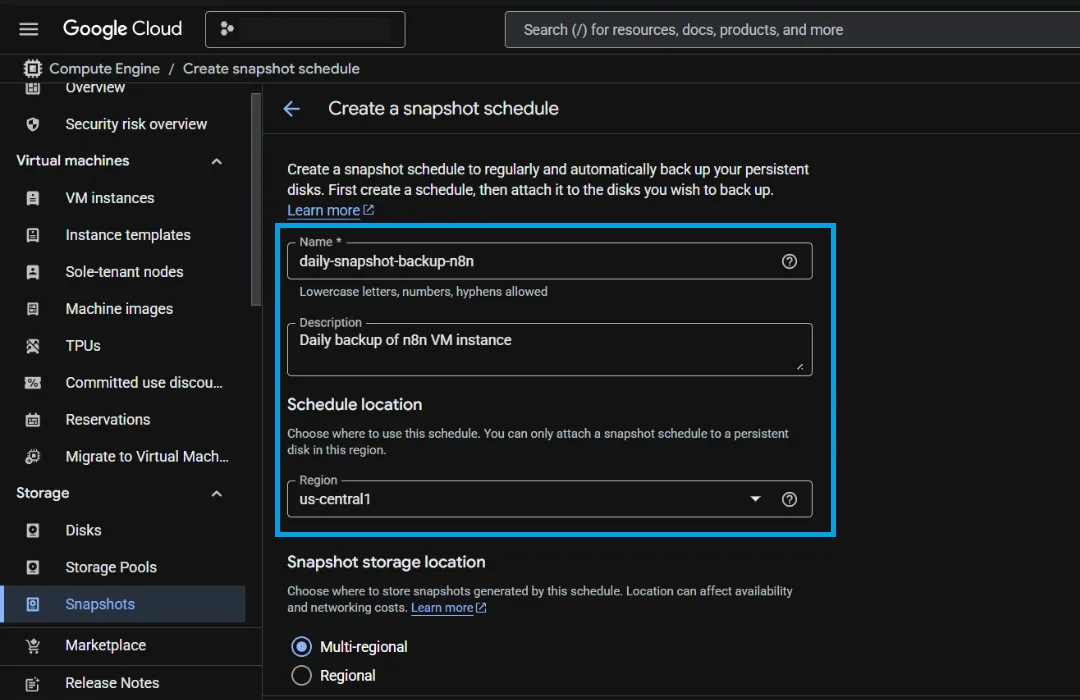
Choose the Storage Location
Next, select the region where your persistent disk is located. Google Cloud allows you to store snapshots in the same region as your VM for lower latency and cost. If you want extra protection, you can opt for a different region or even multi-regional storage, but keep in mind this may increase storage costs and network transfer fees.
Set the Frequency and Timing
Decide how often you want your backups to run—options include hourly, daily, or weekly. You’ll also pick a time window for when the snapshots should be taken. For most users, scheduling backups during off-peak hours helps avoid any impact on performance.
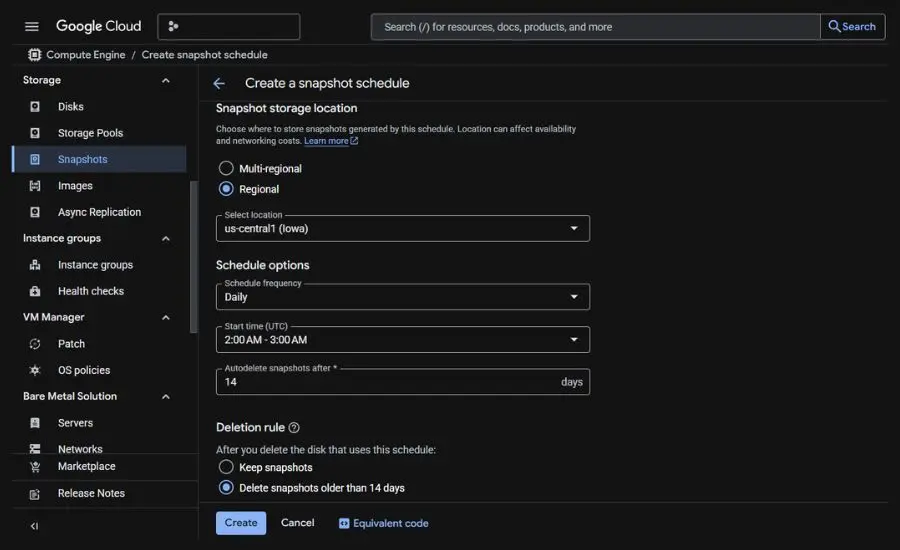
Define the Retention Policy
Specify how long you want to keep your snapshots before they are automatically deleted. Setting a retention policy ensures your backup storage doesn’t grow out of control and helps manage costs effectively.
Finalize and Create the Schedule
Once you’ve configured all the settings, click Create. Your snapshot schedule is now active, and Google Cloud will handle backups automatically according to your preferences.
Attach the Snapshot Schedule to n8n VM Disk
Before your backups can run automatically, you need to link the snapshot schedule to your n8n server’s persistent disk. This step tells Google Cloud exactly which disk to back up and when, making sure your environment is always protected according to your chosen routine.
Locate Your Persistent Disk
In the Google Cloud Console, navigate to Compute Engine and select Disks from the menu. Browse the list to find the persistent disk that’s connected to your n8n VM.
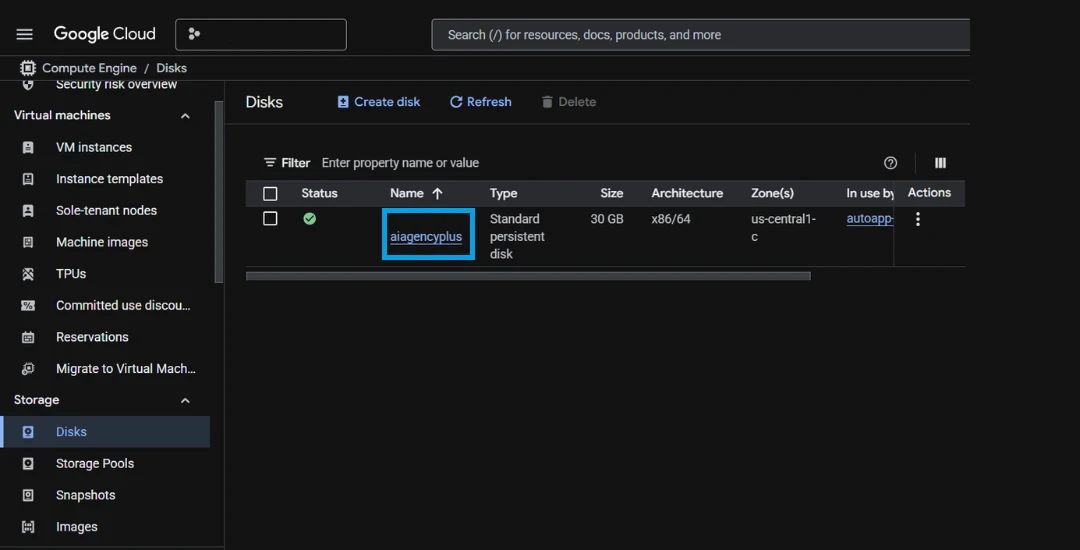
Open Disk Details
Click the name of your chosen disk to open its details page. This will display all the configuration options and current settings for that disk.
Edit Disk Settings
At the top of the details page, click Edit. This allows you to make changes to the disk’s configuration, including backup settings.

Assign the Snapshot Schedule
Scroll to the Snapshot schedule section. From the dropdown menu, select the snapshot schedule you previously created for your n8n backups.
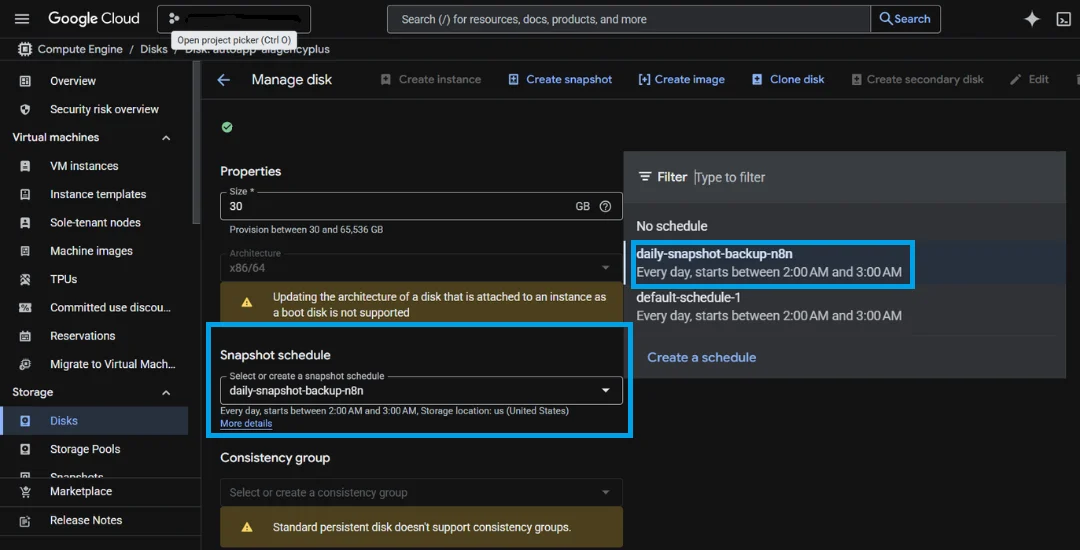
Save Your Changes
Once you’ve chosen the schedule, click Save at the bottom of the page. Your n8n disk is now set to follow the automated backup routine, giving you peace of mind that your environment is regularly protected.
Keep Your n8n Automations Safe: Make Backups Work for You
With automated Google Cloud backups in place, your n8n environment is protected from unexpected mishaps and data loss. Every Docker volume, file, and configuration is covered, so you can focus on building workflows, not worrying about recovery.
If you ever face a failed upgrade or an accidental change, restoring from a recent snapshot or spinning up a replacement VM is quick and straightforward.
Don’t forget to test your backups from time to time to make sure everything works smoothly when it matters most. And if you want expert guidance or hands-on help with your automations, book a free discovery call with our team. We’re here to help you get the most out of n8n and keep your workflows running without interruption.