
Tired of hitting limits with automation tools? Want full control over your workflows without breaking the bank? Then self-hosting n8n on Google Cloud is exactly what you need and the best part? You can do it for free using Google’s e2-micro VM tier (as long as you stay within the free limits).
This setup gives you the freedom to build unlimited workflows, connect all your favorite apps, and customize every detail of your automation stack. Whether you’re automating internal tasks, stitching together third-party tools, or just experimenting with powerful integrations, hosting n8n yourself means you’re calling the shots.
In this step-by-step tutorial, I’ll show you exactly how to get n8n running on a Google Cloud VM using Docker Compose. From spinning up the server and securing it with HTTPS to keeping your data persistent and updates hassle-free, I’ll cover it all.
By the end, you’ll have a rock-solid, secure, and flexible self-hosted n8n instance that’s ready to power whatever you throw at it.
Step 1: Set Up Free Google Cloud VM to Host n8n Instance
To get started, you’ll need to deploy a virtual machine on Google Cloud. The e2-micro instance is a great choice if you’re just testing things out or running a few lightweight automations, it falls under Google Cloud’s Free Tier, so you won’t be charged as long as you stay within the limits. If you expect heavier usage or plan to scale up your workflows, consider upgrading to a higher-tier machine for better performance and reliability.
1. Create a New Project in Google Cloud
Start by logging into your Google Cloud Console. At the top of the page, you’ll see a dropdown menu where you can manage your existing projects. Click on that, then select “New Project” to begin. Give your project a clear, recognizable name, something like n8n-automation-project works well. This new project will serve as the container for everything related to your n8n deployment, helping you keep things organized and easy to manage as you build out your setup.
2. Enable the Compute Engine API
With your project created, the next step is to enable the Compute Engine API, which allows you to create and manage virtual machines. In the Google Cloud Console, use the search bar at the top to look for “Compute Engine API.” When it appears in the results, click on it, then hit the “Enable” button. This will activate the service for your project and unlock access to the tools you need to launch your VM.
3. Access the Compute Engine and Create a VM
After enabling the API, search for “Compute Engine” in the console to open the service dashboard. From there, navigate to the VM Instances section. You’ll likely see a prompt to create your first instance, go ahead and click Create Instance to begin setting up the virtual machine where n8n will run.
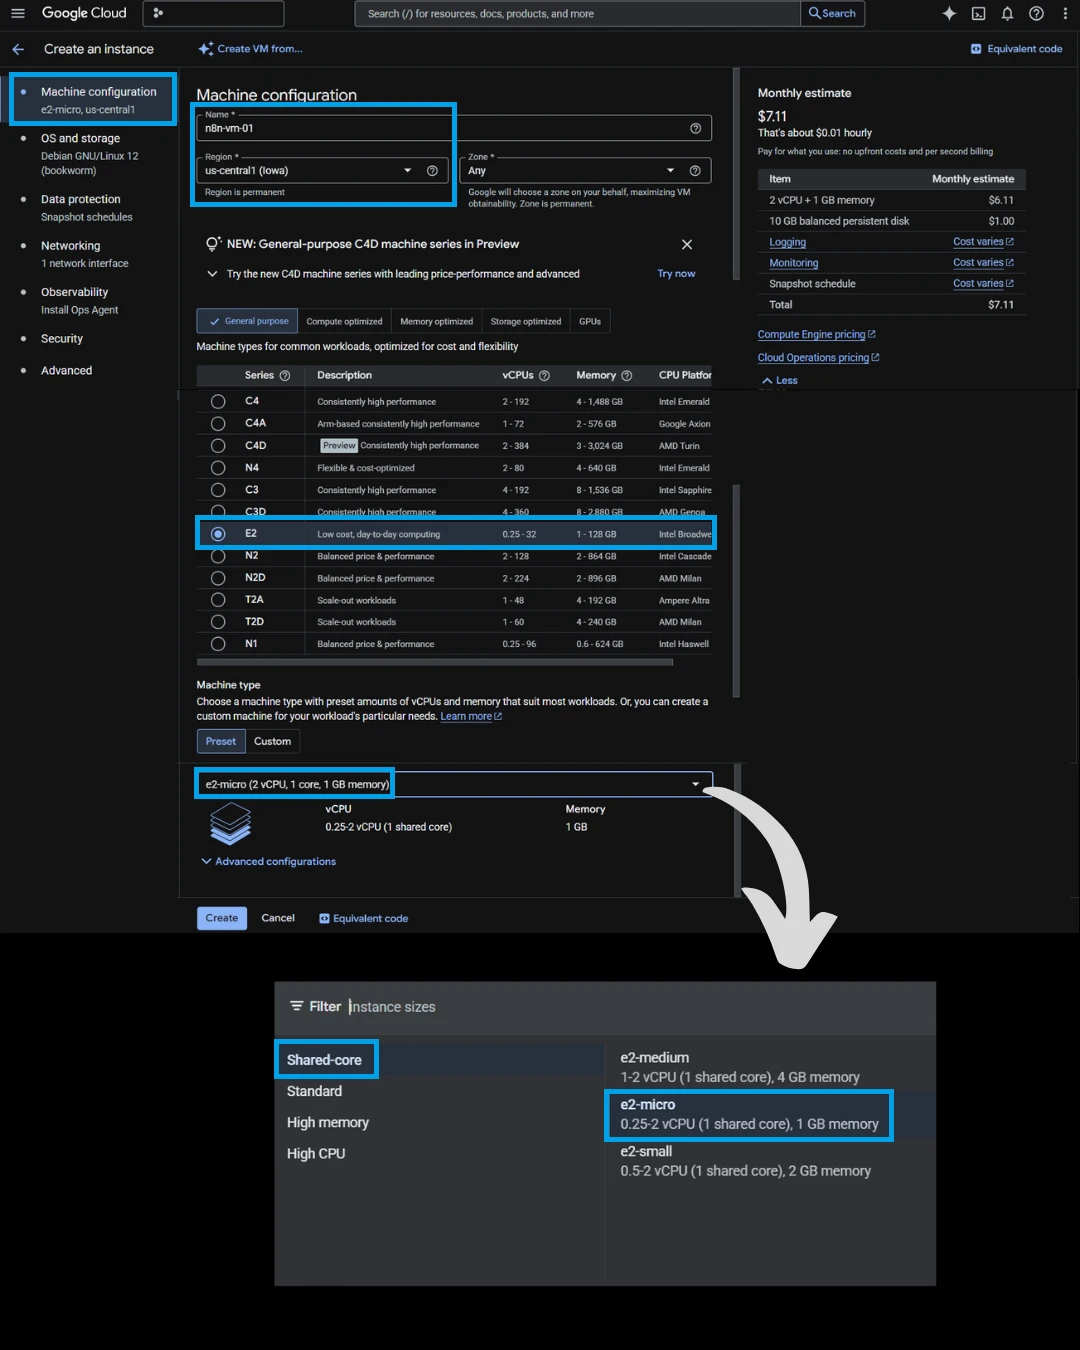
4. Configure the VM Instance
Now it’s time to customize your virtual machine settings. Start by giving your instance a name that makes sense, n8n-instance is a good example. For the Region and Zone, be sure to pick one that qualifies for the free tier, such as us-west1 (Oregon), us-central1 (Iowa), or us-east1 (South Carolina).
Next, choose the e2-micro machine type. This option is eligible for the free tier and is suitable for lightweight use cases like basic automation workflows.
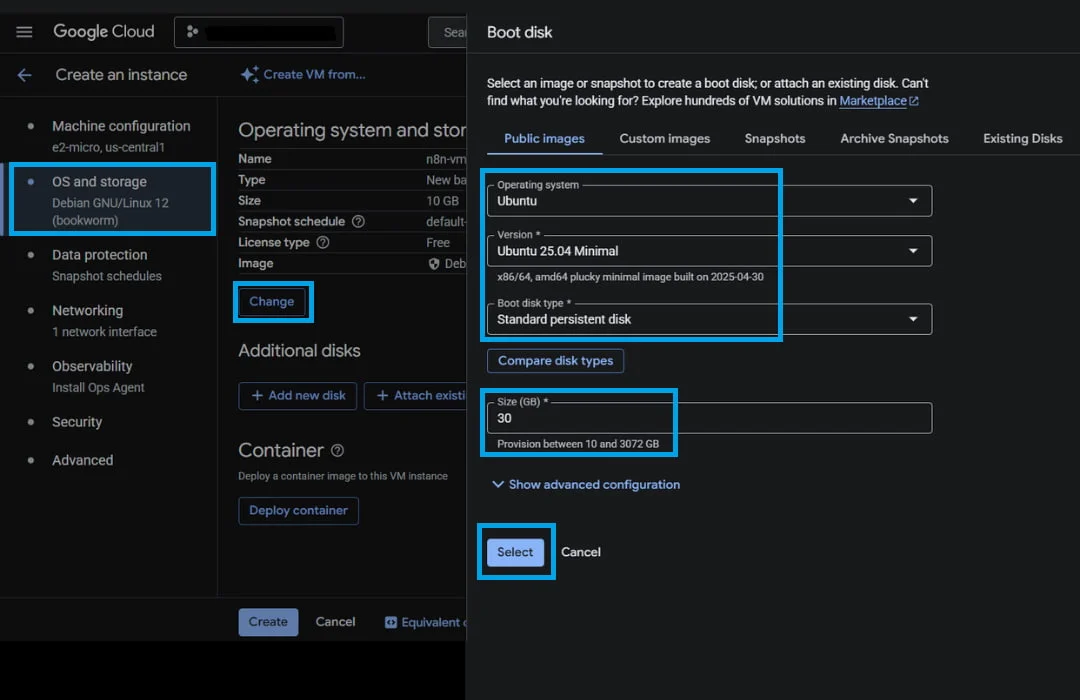
Under the Boot Disk section, select Ubuntu as your operating system, change boot disk type to “standard persistent disk”. It’s also a good idea to increase the default disk size to 30 GB to ensure you have enough space for logs, updates, and workflow files.
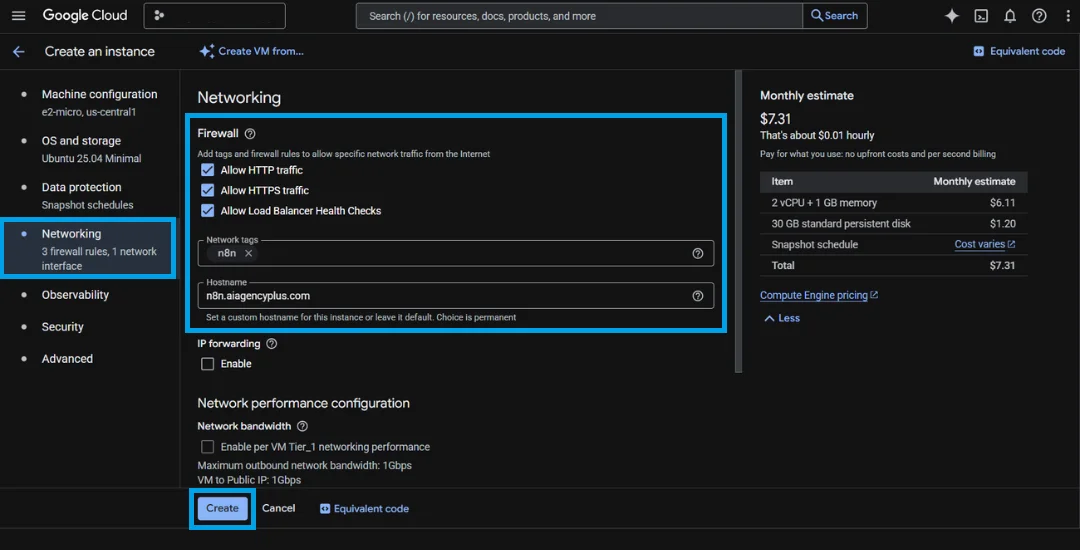
Finally, scroll down to Firewall settings and check the boxes to allow HTTP, HTTPS, and Load Balancer Health Check traffic. This ensures your n8n instance will be accessible over the web once it’s up and running. Finally set network tag and hostname for this server.
5. Launch the VM
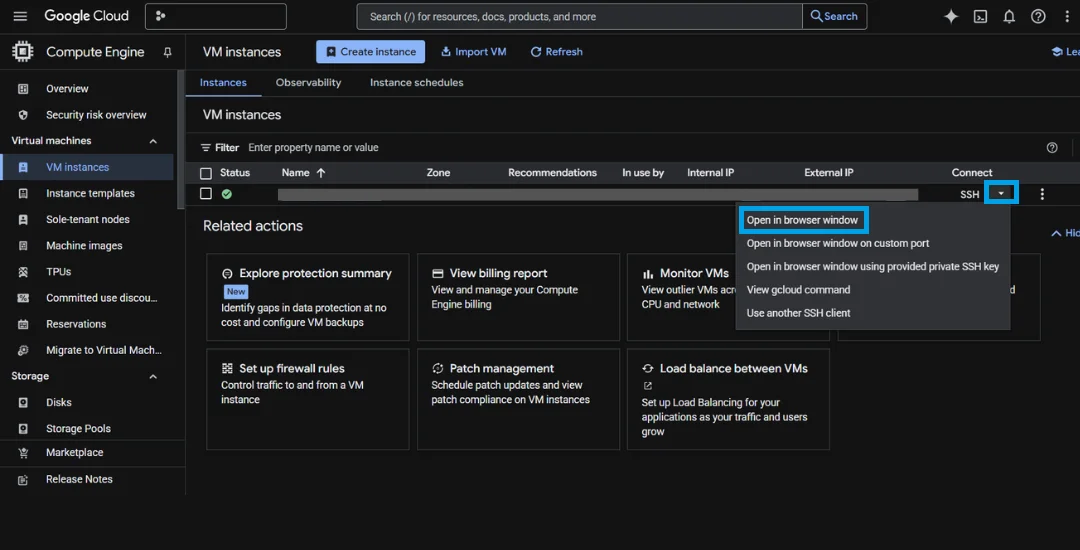
Once VM up and running, click the down arrow next to the SSH button and choose Open in browser window, this will open a terminal window right in your browser, giving you direct access to your server.
At this stage, your Google Cloud virtual machine is up and running. You now have a clean, flexible environment ready to host n8n, powered by Google’s free tier infrastructure. Be sure to note down the External IP address of your VM, as you’ll need it in the next step when setting up your DNS records.
Step 2: Set Up Your DNS with a Custom Domain
To access n8n instance securely over HTTPS, you’ll need to link a domain (or subdomain) to your Google Cloud VM. This step is essential for generating an SSL certificate and accessing n8n through a clean, user-friendly URL like n8n.yourdomain.com instead of a raw IP address.
The process is similar across most domain providers. If you’re using GoDaddy, Namecheap, or Hostinger, start by logging into your account and navigating to the DNS settings for your domain. From there, you’ll need to create a new A record.
Set the Name (or Host) to your chosen subdomain, such as n8n, and point it to the public IP address of your Google Cloud VM. This record tells the internet that requests to n8n.yourdomain.com should go to your server.
While the layout and labels might vary slightly between providers, the steps are essentially the same. After saving the record, DNS changes typically propagate within a few minutes, though in some cases it can take up to 24 hours. Once it’s live, your domain will be ready to use for your secure n8n setup.
Step 3: Prep Your Server – Install Docker, Docker Compose & Nano Text Editor
Before we install anything, let’s make sure VM is fully up to date. This ensures you’re working with the latest package lists and avoids potential compatibility issues. Once that’s done, we’ll install Nano text editor, a lightweight and beginner friendly text editor. Nano makes it easy to view, create and edit configuration files right in the terminal, super handy when you’re tweaking .env files or Docker configs. Finally we’ll move on to setting up Docker and Docker Compose.
Here’s how to get everything installed and ready for action on Ubuntu.
# Update package list and installs the latest versions of all installed packages
sudo apt-get update
sudo apt-get upgrade
# Install prereq packages
sudo apt-get install ca-certificates curl
sudo apt install nano
# Download the repo signing key
sudo install -m 0755 -d /etc/apt/keyrings
sudo curl -fsSL https://download.docker.com/linux/ubuntu/gpg -o /etc/apt/keyrings/docker.asc
sudo chmod a+r /etc/apt/keyrings/docker.asc
# Configure the repository
echo "deb [arch=$(dpkg --print-architecture) signed-by=/etc/apt/keyrings/docker.asc] https://download.docker.com/linux/ubuntu $(. /etc/os-release && echo "${UBUNTU_CODENAME:-$VERSION_CODENAME}") stable" | sudo tee /etc/apt/sources.list.d/docker.list > /dev/null
# Update and install Docker and Docker Compose
sudo apt-get update
sudo apt-get upgrade
sudo apt-get install docker-ce docker-ce-cli containerd.io docker-buildx-plugin docker-compose-plugin
Run the following commands to confirm that Docker and Docker Compose are installed correctly and to check their versions:
# Check docker version
docker --version
# Check docker compose version
docker compose version
Step 4: Create the .env File for n8n Configuration
Now that Docker is ready to go, it’s time to set up your environment configuration. Start by creating a dedicated directory to keep things organized. This folder will hold your .env file and the docker-compose.yml file you’ll create next.
In your terminal, run the following commands:
mkdir n8n-compose
cd n8n-compose
Inside this directory, you’ll create a .env file. This file stores important environment variables that Docker Compose will use to configure your n8n instance, like the domain where it will be hosted, your email (used for generating SSL certificates), and your preferred timezone.
sudo nano .env
Here’s a basic example of what your .env file should look like:
# ============================================
# n8n CONFIGURATION FILE
# ============================================
# This file contains environment variables for your n8n Docker installation.
# Make sure to update these values to match your specific setup.
#
DOMAIN_NAME=YourDomain.com
SUBDOMAIN=YourSubDomain
GENERIC_TIMEZONE=YourTimeZone(Example:Europe/London)
SSL_EMAIL=YourEmail
#
# ============================================
# NOTES
# ============================================
# After making changes to this file, you'll need to restart your Docker containers
# for the changes to take effect run: "sudo docker compose down && sudo docker compose up -d"
Be sure to replace the placeholder values with your actual domain, subdomain, and email address. This .env file is used to store key settings separately from the main Docker Compose file, helping keep your setup cleaner and easier to manage. After you’ve added your details, press Ctrl + O and then Enter to save the file, then Ctrl + X to exit Nano.
Step 5: Set Up a Local Files Directory
The local-files directory is where your n8n instance will store and access files shared between the host system and your workflows. This directory is essential for workflows that use nodes like “Read/Write Files from Disk,” enabling seamless file operations within your automation processes.
Create Local Files Directory
# Navigate to your project directory, where your Docker Compose setup resides.
cd n8n-compose
# Create the directory
mkdir local-files
# Confirm that the directory has been created
ls -a
The local-files directory acts as the central hub for all file operations handled by your n8n instance, whether you’re reading data into workflows or saving outputs. Creating this directory manually ensures it’s properly configured with the right permissions and ownership. Most importantly, it keeps your files persistent across n8n upgrades, so your workflows remain intact even when you update to a newer version.
Step 6: Create a Docker Compose File
Now it’s time to define the backbone of your self-hosted n8n setup: the docker-compose.yml file. This file outlines the configuration for your n8n instance and the Traefik reverse proxy, which handles routing and TLS/SSL certificates. Let’s walk through the process of creating this file and understand its components.
Create docker-compose.yml file
sudo nano docker-compose.yml
Paste below into nano editor
services:
  traefik:
    image: "traefik"
    restart: always
    command:
      - "--api=true"
      - "--api.insecure=true"
      - "--providers.docker=true"
      - "--providers.docker.exposedbydefault=false"
      - "--entrypoints.web.address=:80"
      - "--entrypoints.web.http.redirections.entryPoint.to=websecure"
      - "--entrypoints.web.http.redirections.entrypoint.scheme=https"
      - "--entrypoints.websecure.address=:443"
      - "--certificatesresolvers.mytlschallenge.acme.tlschallenge=true"
      - "--certificatesresolvers.mytlschallenge.acme.email=${SSL_EMAIL}"
      - "--certificatesresolvers.mytlschallenge.acme.storage=/letsencrypt/acme.json"
    ports:
      - "80:80"
      - "443:443"
    volumes:
      - traefik_data:/letsencrypt
      - /var/run/docker.sock:/var/run/docker.sock:ro

  n8n:
    image: docker.n8n.io/n8nio/n8n
    restart: always
    ports:
      - "127.0.0.1:5678:5678"
    labels:
      - traefik.enable=true
      - traefik.http.routers.n8n.rule=Host(`${SUBDOMAIN}.${DOMAIN_NAME}`)
      - traefik.http.routers.n8n.tls=true
      - traefik.http.routers.n8n.entrypoints=web,websecure
      - traefik.http.routers.n8n.tls.certresolver=mytlschallenge
      - traefik.http.middlewares.n8n.headers.SSLRedirect=true
      - traefik.http.middlewares.n8n.headers.STSSeconds=315360000
      - traefik.http.middlewares.n8n.headers.browserXSSFilter=true
      - traefik.http.middlewares.n8n.headers.contentTypeNosniff=true
      - traefik.http.middlewares.n8n.headers.forceSTSHeader=true
      - traefik.http.middlewares.n8n.headers.SSLHost=${DOMAIN_NAME}
      - traefik.http.middlewares.n8n.headers.STSIncludeSubdomains=true
      - traefik.http.middlewares.n8n.headers.STSPreload=true
      - traefik.http.routers.n8n.middlewares=n8n@docker
    environment:
      - N8N_HOST=${SUBDOMAIN}.${DOMAIN_NAME}
      - N8N_PORT=5678
      - N8N_PROTOCOL=https
      - NODE_ENV=production
      - WEBHOOK_URL=https://${SUBDOMAIN}.${DOMAIN_NAME}/
      - GENERIC_TIMEZONE=${GENERIC_TIMEZONE}
    volumes:
      - n8n_data:/home/node/.n8n
      - ./local-files:/files

volumes:
  n8n_data:
  traefik_data:
After you’ve added your details, press Ctrl + O and Enter to save the file, then Ctrl + X to exit Nano.
The Docker Compose setup you just created does more than just spin up n8n—it also launches Traefik, a powerful reverse proxy that automatically handles HTTPS (SSL certificates) and smart routing to your app.
Behind the scenes, it sets up two Docker volumes to store important data:
- One for n8n’s internal files, like its database and encryption keys
- One for Traefik to safely store your SSL certificates
On top of that, it mounts the local-files directory you created earlier. This makes it easy for your n8n workflows to read and write files directly to your server using the /files path inside n8n.
Step 7: Launch n8n with Docker Compose
Everything’s set its time to bring your n8n instance to life!
To start the containers in the background, just run:
# Launch docker compose
sudo docker compose up -d
This command tells Docker to launch everything based on your docker-compose.yml file, including n8n and Traefik.
To stop n8n, use the following command:
# Do NOT run this command – for informational purposes only.
# To Stop docker compose
sudo docker compose stop
Step 8: Setup Owner Account
Once your n8n instance is deployed and running, the final step is to create your owner account — this will be the primary login used to access and manage your n8n workflows.
🔹 Wait 2–3 minutes for the instance to fully start up after deployment.
🔹 Open your browser and visit the URL you configured (e.g. https://n8n.yourdomain.com).
🔹 You should be greeted with the n8n setup screen asking you to create an owner account.

Fill in your email, first name, last name and password. Once submitted, this information is stored in the database and remembered going forward — you won’t need to repeat this again.
Unlock Paid Features for Free
After you create your owner account, you’ll see an option to enter your email to activate n8n’s Fair Code license. This gives you access to paid features for free.

This completes the setup. You now have a fully self-hosted, secure, and production-ready n8n instance running on Google Cloud.
Troubleshooting SSL Certificate Issues
If you’re seeing an SSL error after deploying n8n, it likely means the certificate wasn’t successfully issued. This usually happens if DNS wasn’t fully propagated or there was an issue during the initial request. A quick fix is to delete the existing certificate data and re-request a new one:
# Step 1: Stop the running containers
sudo docker compose down
# Step 2: Remove the old certificate file
sudo rm -rf ./letsencrypt/acme.json
# Step 3: Start the containers again to trigger a fresh certificate request
sudo docker compose up -d
Set Up Scheduled Backups for Your n8n Server
Now that your n8n instance is up and running, it’s essential to protect your setup with regular backups. One of the easiest and most reliable methods is using Google Cloud Persistent Disk Snapshots. This approach creates point-in-time copies of your VM’s disk, so you can quickly roll back if anything goes wrong during updates or configuration changes.
For a detailed, step-by-step walkthrough on setting up automated and reliable n8n backups—including best practices and troubleshooting tips—check out our full guide: How to Back Up Your n8n Instance on Google Cloud.
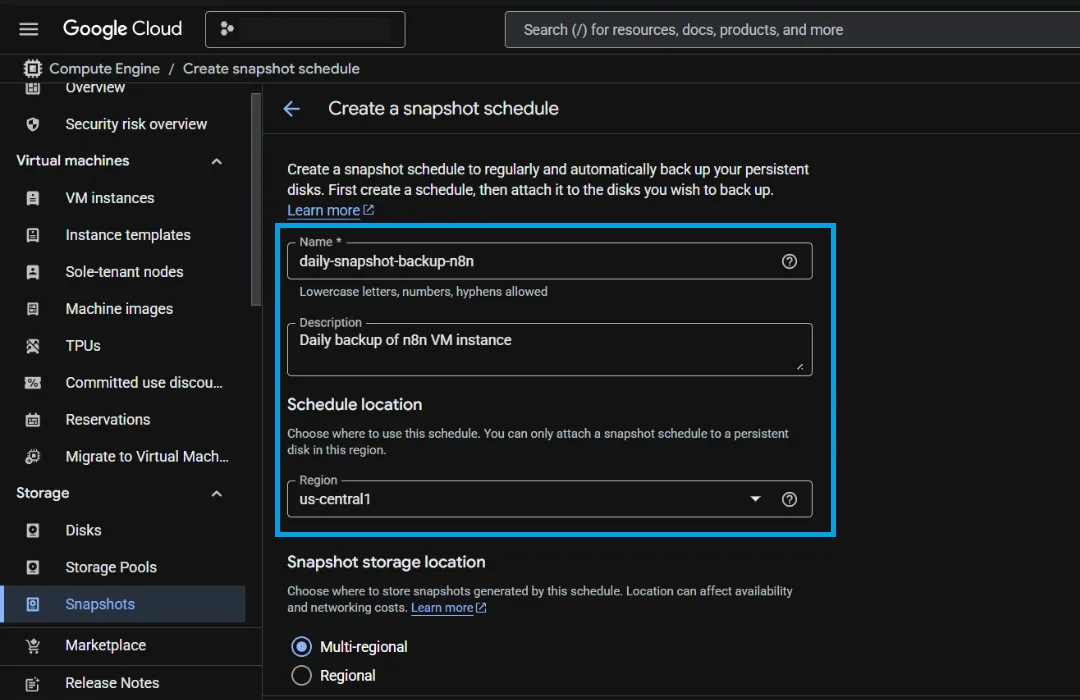
Google Cloud lets you automate this process with a snapshot schedule, eliminating the need for manual intervention. Simply navigate to the sidebar, open Compute Engine > Snapshots, and click “Create snapshot schedule” to get started.

Create a snapshot schedule based on your specific requirement
Navigate to Compute Engine > Disk – Click the disk name hyperlink
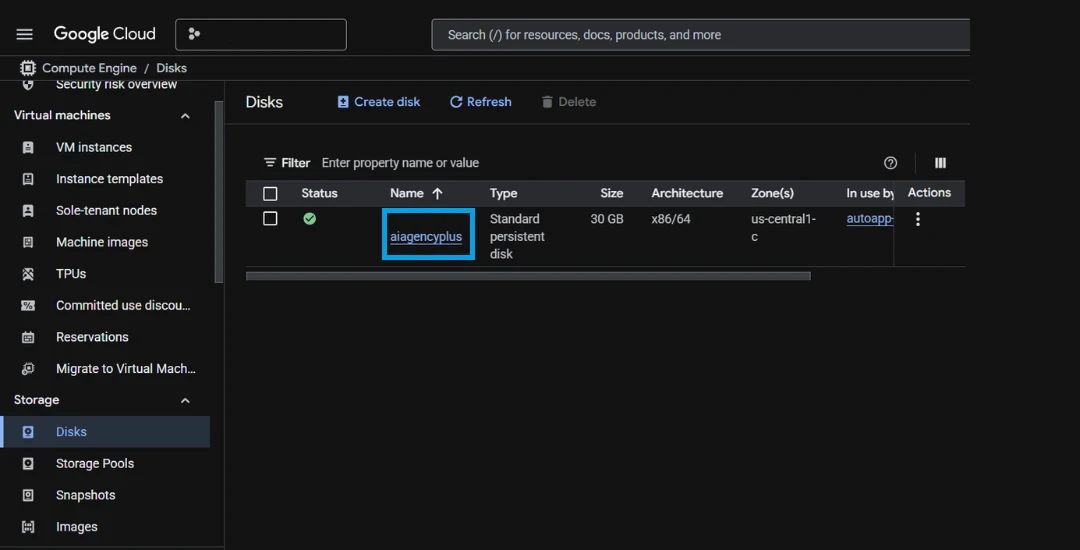
Edit the disk

Set snapshot schedule
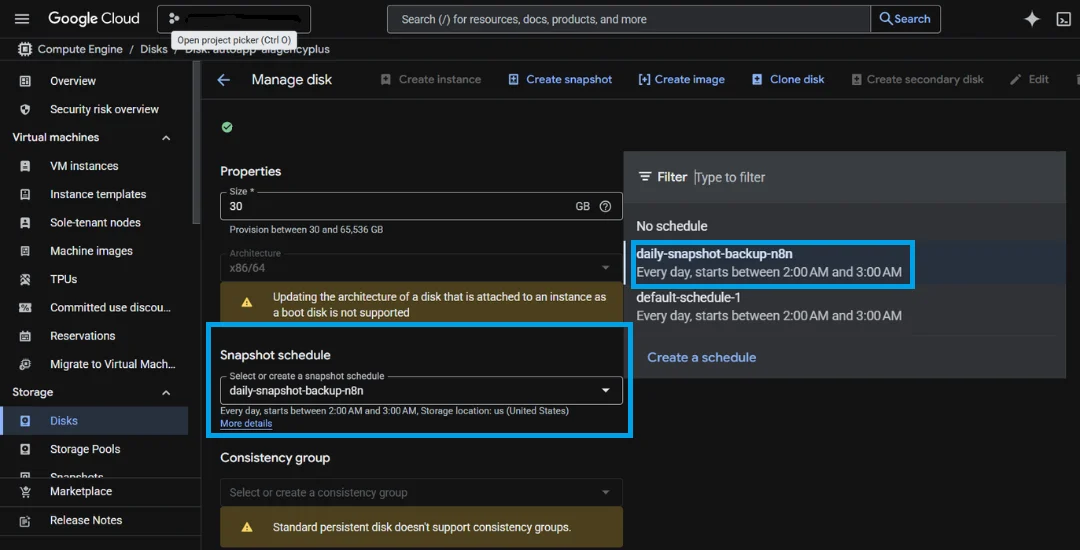
With this in place, your entire n8n environment, including Docker, files, and configurations is backed up regularly without needing to manually script anything inside the VM.
In case of issues (like failed upgrades or accidental config changes), you can:
- Restore the full disk from a snapshot.
- Spin up a replacement VM using the snapshot as the base.
How to Update Self-Hosted n8n Instance
Keeping your n8n instance up to date is straightforward with Docker Compose. Just keep in mind that during the update process, your instance will briefly go offline.
Any scheduled workflows or webhooks may fail in that short window, so it’s best to avoid running critical automations while you update.
For a detailed, step-by-step walkthrough on updating your self-hosted n8n safely and efficiently, check out our full guide: How to Update Self-Hosted n8n with Docker Compose
# Navigate to your project directory, where your Docker Compose setup resides.
cd n8n-compose
# Download the latest n8n and Traefik images
sudo docker compose pull
# Stop and remove the current containers
sudo docker compose down
# Start everything back up with the new version
sudo docker compose up -d
Once these steps are complete, your n8n instance will be running the newest version, all your data, workflows, and settings will remain intact.
Wrapping Up: Your Self-Hosted n8n Is Ready to Roll!
You’ve made it through all the key steps, from spinning up a Google Cloud VM to installing Docker, setting up Traefik for secure access, and launching your own self-hosted n8n instance. Whether you’re testing things out on the free tier or planning to scale into more advanced AI workflows, your environment is now fully prepped for automation success.
With this setup, you get full control over your data, better performance, and the freedom to customize n8n however you like. No more relying on third-party limits, you’re running your own powerful automation engine right on Google Cloud.
Reference n8n docs – https://docs.n8n.io/hosting/installation/server-setups/docker-compose/